
Isabella wasn't feeling well and was thus running without much vigor. She had trouble getting up even small hills and accelerating from a stop. During those times she felt like she was only running on 3 or 4 cylinders and would often buck and cough, especially when cold.
Naturally, that all points to a fuel problem. I checked a few things including the throttle position sensor (TPS), the idle sensor, coolant temperature sensor, etc. to no avail. Also checked the voltages at the fuel injection control pump, which were ramping up nicely, as well as ignition timing, which at higher RPMs was properly advanced to about 50°.
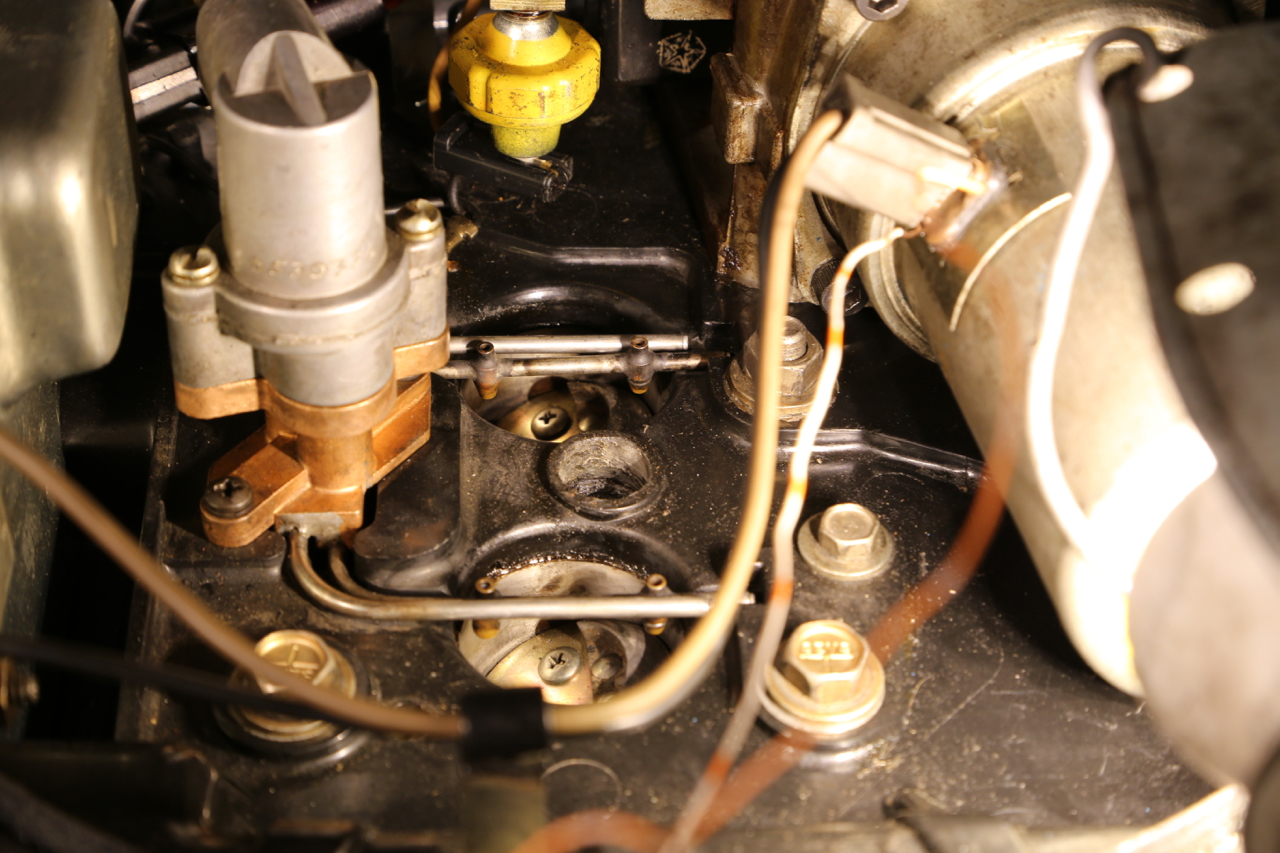
The next thing to check was that fuel was being injected properly. Isabella's system is unique to the 1981-83 Imperial. There are four small brass nozzles mounted on two rails. Two nozzles are mounted on two rails with the nozzles aimed at the edge of the throttle plates.
The mount for the air cleaner is removed for clarity.
The system measures airflow past a flow meter in the air intake snorkel. With no airflow, the system automatically and immediately stops the flow of fuel. Thus, removing the air cleaner cover inhibits system operation since air bypasses the snorkel. However, during engine start, the airflow sensor can't accurately measure airflow; therefore, the system is programmed to inject a small amount of fuel while the key is in the start position. I used this feature to keep the fuel control pump running with the air cleaner cover removed.
I started the engine with the air cleaner off to observe the flow. The flow was weak on the passenger side rail and especially for the rear nozzle. But because the engine started easily, and the flow stopped the instant the key was released to the run position, it was difficult to determine exactly how bad the problem was.
It is possible, on the other hand, to idle the engine with the air cleaner cover removed by applying a start signal to the Combustion Control Computer, which was the term Chrysler used at the time. Today we'd call it an Engine Control Unit (ECU) or Engine Control Module (ECM).
This is the easiest way to do that. The starter relay has a connection to the ignition system so it can apply B+ to the ignition. The yellow wire supplies power from the ignition switch when the key is in the start position. The yellow wire is removed from the connector by simply inserting a piece of stiff wire to disengage the lock. That allows the connection of a jumper wire to the terminal so that the starter relay remains on for as long as power is supplied to the terminal. The brown wire powers the starter solenoid. Once the engines catches, pulling the brown wire's connector off the relay disengages the starter. I connected the other end of the jumper to the yellow wire simply for convenience; it serves no purpose except to allow the car to be started normally with the ignition switch.
Therefore, by supplying +12V from the battery via the red jumper wire, to the starter relay via the black jumper wire, the engine will start. Unplugging the brown wire will disengage the starter, but the engine keeps running because the EFI system is being spoofed into thinking the key is still in the start position.
This is what it all looks like. First I turned the ignition switch on. You'll hear the in fuel tank pump run briefly as it pressurizes the system. Then, moving back to the engine, I connect the jumper wires to apply 12V to the terminal where the yellow wire normally attaches. As soon as the engine starts to run, you'll see me unplug the brown wire from the relay.
The two DVMs are capturing data. The HP 974A on the right is showing the drive voltage applied to the control pump. The BK 2712 on the left is counting pulses measured at the ignition coil.
I captured this video after cleaning the nozzles. It's better, but not perfect. I cleaned them again, which really seemed to solve the problem. It's not necessary to remove the Hydraulic Support Plate from the engine to clean the spray bars and nozzles. Two Phillips head screws fasten the pressure regulator to the plate. First, using two wrenches, disconnect the fuel line from the regulator, then remove the Phillips screws, one is visible in the photo. The regulator and spray bars can be removed as a unit. I soaked the nozzles in toluene, then blew out the assembly with compressed air at the fuel inlet port. Repeat as necessary.
The spray pattern is much better and Isabella's performance is also good.